Monday, July 20, 2015

KITCHEN WALL ART

DIY Wall Art For Your Kitchen:
The internet is full of creative inspiration for your home decor. Don't worry if you don't find exactly what you want or in the colors you need. It's INSPIRATION. ;) Find the "idea" and customize it.
I was looking for cute, whimsical wall art for my kitchen. Time to check "pinterest!" (I love pinterest!! It is more addicting than facebook.) I found the cute and whimsical wall art inspiration I wanted! Then it was time to customize it for my kitchen. My kitchen/living room style is sophisticated farmhouse and my color scheme is black, white and green with yellow & red accents.


How To:
I found a wooden 8 x 10 frame at a yard sale for $0.50! Bargain! Then I found the perfect fabric. I bought 1/2 a yard for $3.50. (There is enough fabric left for another project.)


I bought a bundle of silverware remnants at the thrift store for $2.99. I made sure it had, at least, a fork, knife and spoon. The extras I will use to make more kitchen art for gifts.

Next, I had to decide what color I wanted the utensils to be. I wasn't about to experiment on the real stuff, even if it was from the thrift store. So I used a plastic fork and spoon for a sample. I spray painted one yellow and one red. I liked the contrast of the bold red. WINNER!
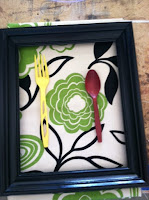


Cut down your fabric. Don't cut it too small. Use hand stapler and craft spray glue to attach fabric. Hot glue your spray painted utensils onto front of fabric.


That's it! Just hang and smile! :)


Do-It-Yourself projects are the best way to go. You can customize it to fit your personal taste and, most of the time, it will be one-of-a-kind. But don't worry if someone decides to copy it for themselves...that shows how much they really liked it!!

~Yvonne ;)


Friday, July 17, 2015

ROOM MAKEOVER: Transition from little girl to tween

My tween daughter outgrew her cute turquoise room and her request for her room make over was...fancy hotel and purple wall.
Hmm. Ok. First we agreed on a purple that was sophisticated rather than kiddish. [Home Depot: Glidden paint in Ancient Violet.]
We tackled the room in stages. I always re-do rooms in layers so that I don't rush and settle for anything. I want to LOVE every bit of a room.

[Bedding: Purchased at Walmart. Mainstays Classic Noir Bed in a Bag Set. $39.88 Full size.]
After
Before
Wall Flower Art: I was inspired by pinterest flower that was made from poster board. I wanted something sturdier so I used these white, plastic file folders I found at Target for $1.00 each. The round mirror was $1.00 from dollar store. TOTAL COST $4.00!
               

I used cardboard (folded in half) to cut flower petal shape to use as a template. I removed the vinyl tabs and I cut the white plastic into strips. I folded each strip in half and placed the folded cardboard template on top. I traced the shape on each strip and cut each strip out. I cut four strips shorter. I dry fit to see how I wanted them to look. I turned the mirror upside down and hot glued the small pieces first and then the larger ones.
The frame backing that I removed from the other wall art, I saved and used a coaster to trace out a circle (with hanger part centered.) Hot glue to the back and hang.


TURNED OUT AMAZING! I TOTALLY LOVE IT AND SO DOES MY DAUGHTER!

...AND because nothing goes to waste...I cut the ends down on the vinyl accordion file and punched holes with my 3-hole puncher. EXTRA TAB DIVIDERS!!!
 

Wall Art grouping: I purchased three certificate sized frames and three wall stickers from the dollar store. I removed the frame backing to have the see through look. Fresh and airy! I hot glued frame hangers and spray painted them black. [Be sure hangers are affixed on securely so frame doesn't fall.] TOTAL COST $6.00!

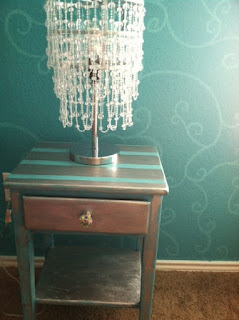
Night Stand: I kept the night stand because the shape still worked for us. The turquoise was out and fresh paint was in. I still had some metallic silver paint that I used on it and we decided to replace the knob with a round crystal one. The lamp still looks awesome on it!
   

Redecorating a room may be challenging but not overwhelming. Don't stress on the paint color. I always say "go for it!" It's only paint. If it's not what you had in mind, try again. :)
Tackling a room in stages or layers, is budget friendly and because you took your time, you are more likely to love every detail.
Be creative. Transform what you already have. Shop yard sales, flea markets, craigslist and, YES, the dollar store!
An upholstered headboard will be the next item and then I'll tackle the other half of the room. It never ends...LUCKY ME!!

~Yvonne ;)

Tuesday, June 9, 2015

FRONT PORCH CHARM

Adding charm to your front porch.
  
Create a bench seating with a faux window. I bought the wrought iron at a store and my husband framed it with wood. We hung it up to create a "window" above the bench. I used red accents in flowers, pillows and paint to match our red front door.
So, get creative! And YES, you can add farmhouse charm to your front porch; even if you live in a suburban neighborhood.
~Yvonne ;)

Tuesday, April 28, 2015

RUSTIC FLOWER BED

Adding rustic charm outside your home is easy and fun. Don't try to achieve perfection. Remember that it is in the imperfections that add character. This means that you can get the kids involved and overcome your OCD issues!

                                 AFTER                                                          BEFORE


Recycle those old fence boards and create your own mini panel for planters. I LOVE how this came out!!
{IDEA: This is a super cute way to plant your herbs!}


Using the recycled old fence boards, again, we made a simple fence. This helped create separation between the front porch seating area and the flower bed, without blocking the view.
I did the same distressed paint treatment on both fencing projects to keep it unified.
And what else would you mount on the fence when you live in Texas?...a longhorn skull, of course!

Creating a rustic flower bed doesn't need to be boring. Rocks, different style pots and flowers that make you smile :) all add charm to your flower bed. Keeping it simple and uncluttered gives it a fresh look.  It's water wise, also!

So have a seat outside, drink your ice tea and enjoy your ... flower bed ... I mean, SUMMER! ~Yvonne